Clients
Navigation: Sidebar → Clients
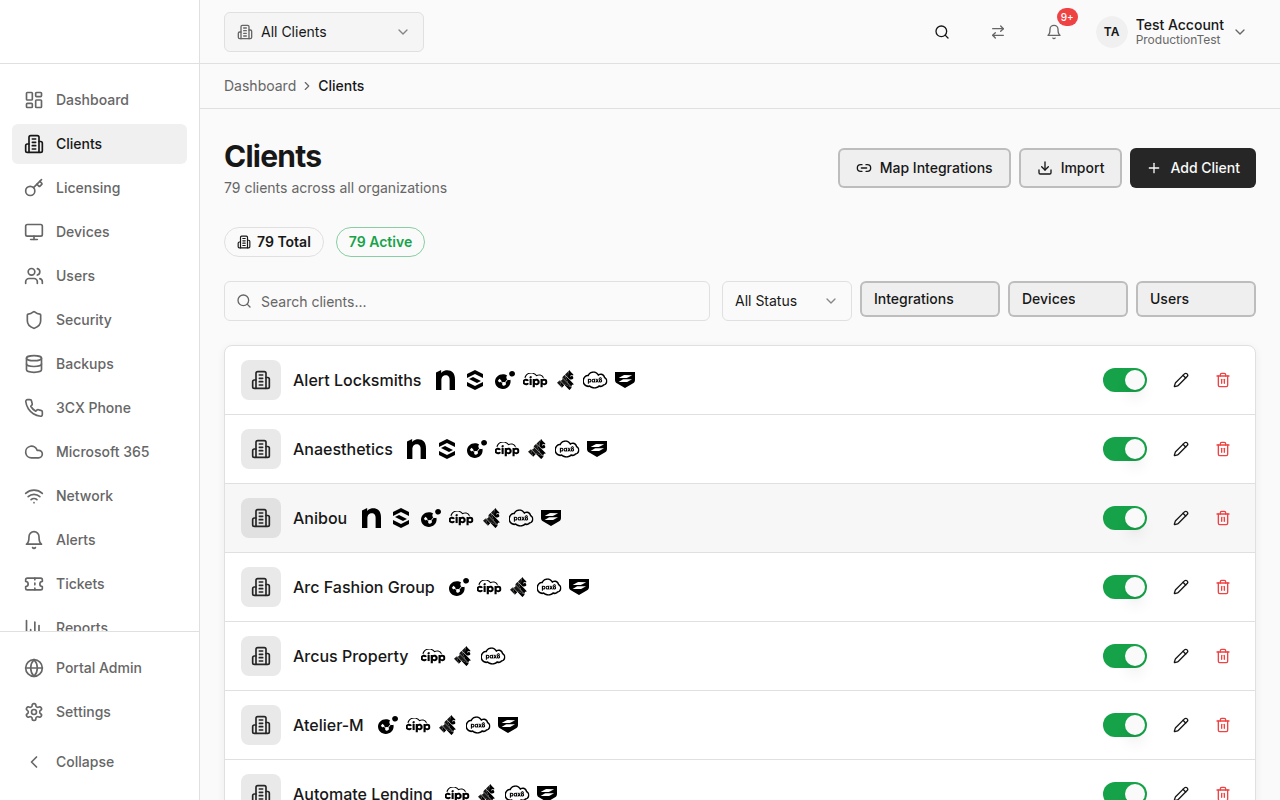
The Clients page is the central hub for managing all of your client organizations. Each client represents a business you manage — their devices, users, backups, and integrations are all linked through their client record.
Client List
The Clients page shows all clients in your organization with summary statistics:
- Stats Badges — Total count, active count, inactive count
- Search — Filter clients by name
- Filters — Filter by status (active/inactive), integration mappings, device count ranges, and user count ranges
Each client row displays:
- Client name
- Active/inactive status
- Connected integration icons (NinjaOne, SentinelOne, M365, etc.)
- Quick actions (edit, toggle active, delete)
Adding a Client
- Click Add Client in the top-right
- Fill in the Client Name (required)
- Toggle Active status
- Map Integration IDs — if you have integrations enabled, fields for each will appear automatically:
- NinjaOne Organization ID
- SentinelOne Site ID
- Microsoft Tenant ID
- Dropsuite ID
- 3CX ID
- And more...
- Click Create
Tip: You can add integration mappings for tools you haven't connected yet by clicking "Map to other integrations" at the bottom of the form.
Importing Clients from Integrations
Instead of manually adding clients one at a time, you can bulk-import from connected integrations. The Import dropdown is built automatically from your integration registry — only sources you have configured in Settings → Integrations appear.
- Click the Import dropdown button (visible when at least one import source is connected)
- Choose a source from the list
- PanelOne fetches organizations, sites, companies, or contacts from that integration
- Select which entities to import as clients
- Click Import — PanelOne creates client records and automatically maps the integration IDs
Available import sources (when connected), grouped by category:
RMM & PSA
- NinjaOne — organizations
- Gorelo — clients
- Syncro — customers
- SuperOps — clients
- TeamViewer — managed groups
- WorkflowMax — clients
Security
- SentinelOne — sites
- Checkpoint Harmony — tenants
- Sophos — tenants
Productivity
- CIPP — tenants
- Microsoft 365 — tenants
Backup
- Dropsuite — backup customers (choose a connection when you have more than one)
Network
- UniFi — sites from synced UniFi data
Billing
- Pax8 — companies
- Xero — contacts
- QuickBooks Online — customers
AI
- Hatz AI — tenants (requires Hatz API key in Settings)
Domains & Hosting
- Synergy Wholesale — domain categories (creates clients and category mappings)
Prerequisites: Before importing from UniFi, run a UniFi sync so sites are available. Before importing from Xero or QuickBooks Online, sync billing contacts or customers so the import list is populated. Before importing from Synergy Wholesale, run a Synergy Wholesale sync so domain categories appear in the import list.
Note: Apple Business / School may appear in the Import menu but opens Settings → Integrations instead of a bulk import dialog — ABM/ASM is configured per tenant there, not via bulk client import. Synergy Wholesale imports domain categories as clients and also supports category mapping via Map Integrations.
Bulk Integration Mapping
If you already have clients but need to link them to integration entities, use Map Integrations. Like Import, this menu only shows integrations you have connected.
- Click the Map Integrations dropdown button
- Choose an integration
- Depending on the integration:
- A mapping dialog opens (most integrations) — match PanelOne clients to integration entities, then click Save Mapping
- You are sent to Settings → Integrations (Apple Business/School)
- The Add Client or Edit Client form opens for 3CX extension mapping
- Save your mappings
Available mapping options (when connected):
- CIPP / M365 — tenants (combined entry when CIPP or Microsoft 365 is connected)
- NinjaOne — organizations
- SentinelOne — sites
- Gorelo — clients
- Checkpoint Harmony — tenants
- UniFi — sites
- Pax8 — companies
- Sophos — tenants
- Dropsuite — backup customers
- Synergy Wholesale (categories) — link service categories to clients
- WorkflowMax — clients
- TeamViewer — managed groups
- Hatz AI — tenant links
- Syncro — customers
- SuperOps — clients
- Xero — contacts
- QuickBooks Online — customers
- Apple Business / School → Settings → Integrations
- 3CX → Add Client / edit form (extension ID)
- SMTP2GO — map each connection to a client
Note: Synergy Wholesale supports both bulk category import and the category mapping dialog. Apple Business / School opens Settings instead of a bulk import dialog.
This is essential for data to flow correctly — devices from NinjaOne are assigned to clients based on these mappings.
Which Integrations Support Import vs Map Only
| Integration | Bulk Import | Map Integrations | Notes |
|---|---|---|---|
| NinjaOne | Yes | Yes | |
| Gorelo | Yes | Yes | |
| Syncro | Yes | Yes | |
| SuperOps | Yes | Yes | |
| TeamViewer | Yes | Yes | |
| WorkflowMax | Yes | Yes | |
| SentinelOne | Yes | Yes | |
| Checkpoint Harmony | Yes | Yes | |
| Sophos | Yes | Yes | |
| CIPP | Yes | Yes | Combined with M365 in Map menu |
| Microsoft 365 | Yes | Yes | Combined with CIPP in Map menu |
| Dropsuite | Yes | Yes | |
| UniFi | Yes | Yes | Sync UniFi first |
| Pax8 | Yes | Yes | |
| Xero | Yes | Yes | Sync contacts first |
| QuickBooks Online | Yes | Yes | Sync customers first |
| Hatz AI | Yes | Yes | Tenants from Hatz API |
| Synergy Wholesale | Yes | Yes | Sync Synergy first; category-based import |
| Apple Business / School | No* | Settings | *Menu item opens Settings |
| 3CX | No | Edit form | Map extension on client form |
| SMTP2GO | No | Yes | Map Integrations dialog (per connection) |
Integrations marked coming soon in the Marketplace (e.g. Datto RMM, ConnectWise Manage, HaloPSA) are not yet available in these menus.
Editing a Client
- Click the pencil icon on any client row
- Update the client name, status, or integration IDs
- Click Update
Deleting a Client
- Click the trash icon on a client row
- Confirm the deletion in the dialog
Warning: Deleting a client removes all device associations. This cannot be undone.
Toggling Active/Inactive
Click the status toggle on a client to quickly switch them between active and inactive. Inactive clients still retain their data but can be filtered out of views.
Client Detail Page
Navigation: Click any client name → Client Detail
The Client Detail page provides a deep dive into a single client with multiple tabs:
Overview Tab
- Client information (name, status, creation date)
- Integration mappings with icons
- Quick stats (devices, users, threats)
- NinjaOne organization details (if mapped)
- Generate NinjaOne installer links
Devices Tab
- All devices belonging to this client
- Online/offline status
- Click any device to go to Device Detail
Users Tab
- M365 users associated with this client's tenant
- MFA status for each user
- Admin indicators
Threats Tab
- Active security threats from SentinelOne
- Severity indicators and threat actions
Backups Tab
- Dropsuite backup status for this client
- Healthy, at-risk, and failed backups
M365 Tab
- Microsoft 365 overview specific to this client
- License usage, security score, domain health
Subscriptions Tab
- Pax8 subscriptions mapped to this client
- License quantities and pricing
- Edit subscription quantities
NinjaOne Features
If the client has a NinjaOne mapping, additional capabilities are available:
- End Users — View and manage NinjaOne end users for this organization
- Organization Documents — View and archive NinjaOne documentation
- Installer Generation — Generate NinjaOne agent installer links
- Custom Fields — View and edit NinjaOne location custom fields
- Custom Tabs — Create custom tabs in NinjaOne
- Checklists — Create checklist templates
- Node Roles — Create and manage node roles
- Document Templates — View NinjaOne document templates with fields
Filters Explained
Status Filter
- All — Show all clients
- Active — Only active clients
- Inactive — Only inactive clients
Integrations Filter
- Has — Show clients that have specific integration mappings
- Missing — Show clients that are missing specific integration mappings
- Select one or more integration types to filter by
Device/User Count Filters
- Set minimum and/or maximum thresholds for device count or user count
- Useful for finding clients with no devices mapped (min: 0, max: 0)
Tips & Best Practices
- Connect integrations first — Import and Map Integrations menus update automatically when you connect or disconnect tools in Settings → Integrations
- Map integrations early — Devices, users, and other data can only be assigned to clients if integration IDs are mapped
- Use bulk import instead of manual creation when first setting up PanelOne
- Check for unmapped clients regularly using the integrations filter with "Missing" mode
- Use the Client Detail page for client review meetings — it has everything in one place
Related Guides
- Device Health — Monitor client devices
- Integrations Overview — What each integration provides
- Settings → Integrations — Connect your tools